Blog
critter cam monitoring with Jen

Assistant stewardship project manager Jen and I embarked on one such adventure a few weeks ago, just five weeks after my first day at the Land Trust. I’m a lifelong Seattleite and a biologist by training — thus, the staff have been making efforts to include me on outings to experience the lands and ecology of Sonoma County. Jen’s outing, a routine check of the wildlife cameras in one section of the Sonoma Valley Wildlife Corridor, was only the second opportunity I’d had to get out on the land. “Full disclosure,” Jen warned in her email invitation, “poison oak, ticks, thistles, heat — it’s all out there.” I packed a bag full of sunscreen and bug repellent and tucked my pants into my socks. I was ready. And a little dorky-looking. But ready.

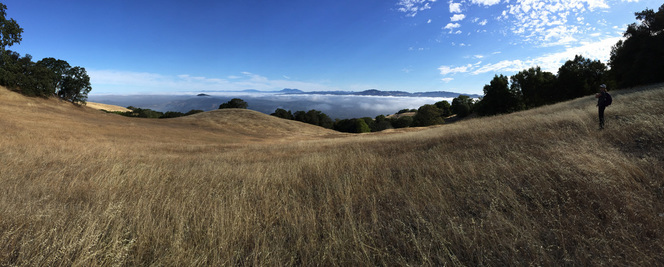 Just look at that fog blanket. Gorgeous.
A short and sweaty hike later, we were near our first camera and I stopped to snap a photo of the morning fog, which hadn’t quite burned off yet. Views like this can’t be beat — only in Sonoma County!
We had just one little hill to climb before reaching camera #1— a hill covered with ripgut brome and burrs, aka “sock destroyers.” We were still pulling those sharp little plant parts, apparently evolutionarily optimized to burrow into whatever brushes against them, out of our socks hours later.

1) Make sure you know which grid point the camera represents. Write the grid point number down on a whiteboard, as well as the date and time, and wave it slowly in front of the camera until you’re sure it’s picked it up. This step lets you know, when you get around to uploading the photos, which memory card corresponds to which grid point.
2) Plug in a remote programmer. This’ll give you the settings for the camera and tell you the battery level, number of photos taken and other key bits of information.
3) Unplug remote programmer. Untie camera from tree or post. Take out batteries using crochet hook because those batteries will NOT come out of the compartment otherwise. Retrieve memory card as well.
4) Replace batteries with fresh ones and push new memory card into slot. Tie camera back on tree or post.
5) Plug in remote programmer again. Change settings of camera — motion sensitivity level, interval between captures, etc. — and take programmer back out.
6) Update whiteboard with current time and wave in front of lens again.
7) Plug in programmer and read number of photos captured to ensure camera is working properly.
8) Close battery compartment and sneak away.
9) Make sure you’ve recorded all of this on your handy-dandy clipboard.
All in all, this should take about 10 minutes — 15 to 20 if you’re clumsy and unused to a crochet hook like me (thanks for your patience, Jen!).
During the next five hours, we trooped to our remaining five cameras and repeated the procedure for each of them. Our day took us up a dirt road to a steep hillside, back down the road and in the truck to a path leading to a poison oak patch, and to a mountain top a half hour’s drive away absolutely covered in yellow star thistle. For our last camera, we perched on a 60-degree slope with loose soil that threatened to give way each time we took a step.