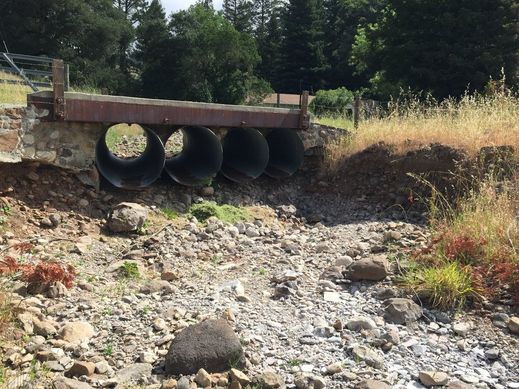
For a construction project like this, it’s tempting to wait until the end and just share the final completed project with “before” and “after” photos. And I will do that when the bridge is complete, but I think part of the intent of this blog is to show you the inside of some of these projects. So we’re going to take a look at what it takes to build a bridge at Live Oaks Ranch. The old, culverted bridge (see photo below) has been eroding and is at serious risk of failure. By replacing this with a new, free-span structure set above the creek, we are helping to restore the natural stream bed, provide better passage for aquatic wildlife and stop erosion that degrades water quality. Since this property contains residences across Bidwell Creek into the farmstead, we’re keeping the old bridge functional and passable while we build the new bridge slightly downstream. Once the new bridge is complete, we’ll demolish and remove the old one. This project is just one part of our greater habitat enhancement plans for Bidwell Creek on Live Oaks Ranch.
The old bridge at Live Oaks Ranch. Notice the erosion and scouring along the banks to the right and left. These culverts do not have the capacity necessary to pass large amounts of water during storms, which can lead to plugging and overtopping.
With all permits in hand, the first step of building the new bridge is excavation for the footings — a concrete support under foundation —one of which is pictured to the right. Inside the footing excavations, contractors place steel rebar to strengthen and reinforce the concrete, which is poured next. The new bridge must be sufficiently anchored to the ground to withstand high flows during large storms — this should do the trick.
As soon as the concrete footings have cured, the headwalls of the bridge can be constructed. Our contractors install another framework of rebar and surround it with a wood mold for the concrete, which allows the concrete to be poured into the desired shape. Ultimately, the bridge will rest on these headwalls.
As soon as the concrete footings have cured, the headwalls of the bridge can be constructed. Our contractors install another framework of rebar and surround it with a wood mold for the concrete, which allows the concrete to be poured into the desired shape. Ultimately, the bridge will rest on these headwalls.
Once the headwalls dry and the mold is removed, rock riprap is placed along the banks to prevent erosion and protect the structure of the bridge during high flows. Later, we’ll be planting riparian vegetation into the banks to improve habitat and provide shade for the creek — and its fish. The channel also has to be graded to match the natural upstream and downstream reaches of the stream. A drainage system is installed behind each headwall to keep water from gathering underground and destabilizing the structure.
So far, that’s what we have completed. It doesn’t look pretty just yet, and it’s far from complete, but this will give you a little insight into how a bridge is built and how much thought goes into the process. The next step is to begin installing the structural steel that will span the bridge from headwall to headwall, and then to eventually pour concrete that will form the deck. Stay tuned for a future blog post where I’ll show you the final product. I hope you’ll join us for an outing at Live Oaks Ranch to see it in person!
Trevor George is a stewardship project manager at Sonoma Land Trust.